|
About Family UW Photos
Aquashot Trip Reports RSDiver Photo Instruction
Wallpaper Images Software Site Map |
Fish Portrait and Close-up TechniquesNote: this section is not yet complete. Please check back later. Fish portraiture is arguably the easiest technique of anything you can do with a camera underwater. It generally doesn't require much in the way of special equipment, the composition rules are easy to remember and easy to follow, and everyone likes pictures of colorful fish. TTL strobe control works most of the time.
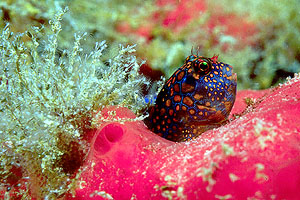
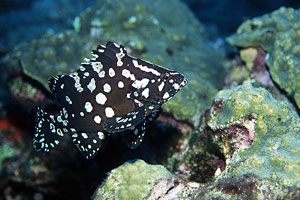
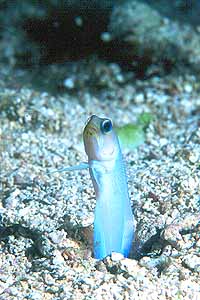
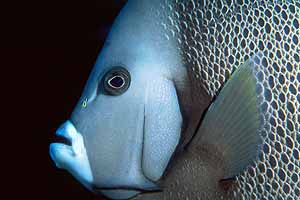
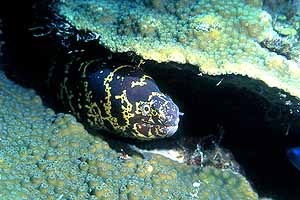
Here are the basics. First, your goal is to get your subject to fill most of the frame (no less than 50%), preferably in perfect profile. That is, the most common fish portrait is completely from the side, so you can see the whole length of the fish. You want sharp focus from eyeball to tail; since generally only one subject-to-lens distance is perfectly focussed, you pretty much need the entire fish to be at the same distance from your lens. This means that if has to be shot from the side. This rule should not keep you from shooting if the fish is slightly "tilted" towards or away from the lens, but for great fish portraits you should avoid shooting the fish directly head-on. You should never shoot "fish butts," as they're not good for much. You can't use the pictures for ID purposes easily, and you often can't get enough detail of color or structure even to see what kind of fish it is! Second: The most important place to focus is on the eye of the fish. If the eye is out of focus, your pictures will look weird. This is not to say you have to focus exactly on the eye, just that the eye needs to be in sharp focus. If your depth of field is enough to cover the eye, that's good enough. Just make sure the eye will be in focus. When in doubt, focus on the eye. Third: the best fish portraits demonstrate some sort of behavior that is typical of the subject. For instance, blennies are often shot sticking out of their holes, jawfish are often shot hovering over their burrows, etc. A grouper sitting on the bottom is often dull, but the same grouper with its mouth wide open at a cleaning station is much more exciting. Think about your subject and try to think about what you visualize the fish doing when you think about it, and then go get that picture. Chances are that other people think about that fish the same way...and if not, well, you'll get a picture that's unique to you and your style. That's not a bad thing! Fourth: do not shoot the fish from above, with reef below it. Several bad things happen when you do this. First, your subject is easily lost in the clutter. Consider that many predators strike from above, so many prey fish are colored to camouflage themselves when seen from above. As a result, many fish will disappear into the background if you shoot from above. Even the ones that don't have natural camouflage will be harder to pick out from the background clutter. You're best off shooting fish from the same level or slightly below them. If you're slightly below the fish, the background will likely be mostly blue water, which will provide some natural separation between subject and background. Shooting on the same level as the fish is a good choice too, as long as the background doesn't compete too strongly. Fifth: get as close as possible to your subject. You'll get sharper focus, better light from your strobes, etc. All of these are good things. Keep in mind that some subjects pretty much require long lenses for reasonable portraits; small creatures like blennies, jawfish, shrimp, etc. will often require 60 to 100mm lenses to yield decent portraits. In these cases, the "rules" of macro photos apply as well. Larger subjects will not be easy to photograph with long lenses. You have to know the limits of the lens setup you're using. Use long lenses to shoot small subjects, and shorter lenses for larger subjects. There are exceptions, of course, but this is still a good rule of thumb. In general, I'd say 50mm - 60mm is the ideal lens length for general fish portraits. You'll be able to shoot blennies up to angelfish with a 60mm macro lens. Finally: don't forget the general rules of composition. Rule of thirds, diagonal lines, etc. It all still applies. Some examples and comments
|

|
||
About | UW Photos | Scuba Picture Uv the Day | Flower Gardens | Aquashot | Trip Reports | RSDiver | Photo Instruction | News | Desktop/Screensaver Images | Site Map |
||