Using the Shutter Speed and Aperture ControlsIn the previous section, we tried to understand the shutter speed and aperture controls in the context of our Caribbean island analogy. Now it's time to learn what the settings for shutter speed and aperture mean and how to use the controls to get the proper exposure. This is important because although your modern SLR camera usually has at least three "program" modes that set the shutter speed and/or lens aperture for you, there are cases (especially wide-angle photography) where those program modes won't be much help. Also, older Nikonos cameras had no exposure electronics at all, and even the mighty Nikonos V falls down on the job frequently. So let's jump in.
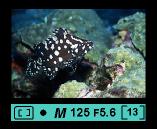
Look at your camera's shutter speed selector. If you have a manual shutter-speed selector, it will probably look something like the one in Figure 1. If you have an autofocus/autoexposure camera, you probably don't have a dial dedicated to setting the shutter speed. It's more likely that you set the shutter speed by activating the camera and then turning a dial while you look at the control deck on top of the camera, or through the viewfinder. To activate; the camera's exposure electronics, point it at something and press the shutter-release button halfway. If you look through the view finder, you should see a picture similar to Figure 2. If you look at the control deck, you'll probably see something like Figure 3. Shutter speed numbers look like 30, 60, 125, 250, 500, 1000, 2000, 4000, etc. Aperture numbers look like 2.8, 4, 5.6, 8, etc. The shutter speeds are in 1/x of a second. So picking 125 means the shutter will be open for 1/125 of a second. Picking 250 means 1/250 of a second, which is half as long as 125 (i.e. 1/125 second). So larger numbers means shorter exposures, and less light reaching your film. Aperture numbers are similar; 2.8 is really f/2.8 (read digression #1 if you want to know why), 4 is really f/4, etc. Where that notation comes from is not important, but it's important to remember that aperture numbers are just like shutter speeds: higher numbers mean less light reaching the film. It's a little weird, but aperture numbers don't have the same relationship between them that shutter speeds do. With shutter speeds, 30 is twice as much light as 60. With apertures, you'd think 4 (i.e. f/4) is twice as much light as 8 (i.e. f/8), but it's really four times as much light. f/5.6 is twice as much light as f/8. Again, read digression #1 if you want to know why. The easy way to remember is that usually cameras are laid out so that going up on the dial settings gives you half as much light each time you go up a setting. That is, going from 30 to 60 to 125 on the shutter speeds cuts the light in half each time you go up. Similarly, going from 2.8 to 4 to 5.6 on the aperture ring cuts the light in half each time. The reverse is true, of course: going down a number on either shutter or aperture doubles the light. When you take a picture, you have to pick an aperture and shutter speed combination. You set the shutter speed using a shutter speed dial (Figure 1) in most cases. On some cameras (most notably Nikon cameras), you set the aperture by twisting a ring on the lens. On others, you use a dial to tell the camera what aperture you want, and it does the rest. On some automatic modes on modern cameras, the dial on top of the camera sets either the aperture or the shutter, depending on which mode it's in. A camera with modern exposure controls can pick shutter & aperture combinations for you, or you can do it manually. If you're going to do it yourself, how do you pick a combination that works? Or, how do the electronic cameras do it for you? Well, remember back to our Caribbean Island analogy. In order to pick the right combination, you need a light meter. You can buy a handheld meter, or you can use one that's built in to your camera. Either way, the meter will tell you a setting to use. But remember the island project? What if the meter told you "10 seconds on the valve with the nozzle 1/4 open." You probably already figured out that you could have set it to 5 seconds with the nozzle 1/2 open, or 2.5 seconds with the nozzle all the way open, but I thought I'd point that out anyway. Setting the aperture and shutter on a camera is identical. If your meter tells you "f/8 at 1/125 seconds," that's the right exposure. But you can get the same amount of light by setting the camera to f/5.6 at 1/250 second, f/4 at 1/500 sec., f/11 at 1/60 sec., or even f/16 at 1/30 sec. So the meter tells you where to start, and you get to pick the rest. So how do you pick 'em? Under water, if you're using 100 speed film, most of the time your meter is going to tell you 1/125 at f/5.6 or maybe even f/8 if you're shallow. If you have a housed camera and a strobe is attached, the camera will probably set itself at 1/60 at f/8. How did I know that? On land, photographers use a rule of thumb called the "Sunny 16 rule." What it means is that in full-sun daylight on a clear or partly cloudy day, a good place to start is with your aperture set to f/16 and your shutter set equal to your film speed. Thus if I'm using 100 speed film, the sunny 16 rule on land would tell me f/16 at 1/125. 200 speed film? f/16 at 1/250. You get the idea. If the conditions vary (mostly cloudy, early or late in the day, etc), you have to open up the aperture (i.e. go to lower numbers) or go to longer shutter speeds (i.e. go to lower numbers). Underwater, there's not as much light, so the "Sunny 16" rule becomes the "Sunny 8" rule near the surface, and the "Sunny 5.6 rule" deeper. Deeper still, it becomes the "Sunny 4" rule. :) Similar to the land-based Sunny 16 rule, if you're diving in early morning or late afternoon, you have to change your exposure to compensate. Many cameras synchronize the shutter to the strobe signal at slower shutter speeds, like 1/60 or 1/125. Nikonos cameras require 1/60. A housed camera might not...but even the best housed camera syncs at 1/250 at the fastest. See digression #2 for details on why, if you care. Mostly, you're going to end up using 1/60 if you're using a strobe. Anyway, back to the main issue: how exactly do you choose an aperture/shutter combination that works? If you have a hand-held light meter, use it. You will have to dial in your film speed, and then it will tell you a shutter/aperture pair that will work. From there, you can change that setting if you want. Remember: to keep the same exposure, go up one number on the aperture for every one number you go down on the shutter speed, and vice versa. If you have a strobe, 1/60 is a reliable setting, and then change your aperture to match. If you have a housed camera that has a built-in meter, you have more choices. I don't want to get into every model of camera, but usually they work in one of two ways. One way is to set the camera to P or A mode (i.e. "full-program" or "aperture-preferred" mode), point the camera at the deep blue sea, and depress the shutter release half-way. Then the camera will give you a combination you can start with. You want to point at blue water, straight ahead or a little down, because then the water will be exposed properly. Usually this will give you proper exposure for the entire background. The other way is to put the camera in manual exposure mode, set the shutter speed to 1/60, and then look through the viewfinder while you press the shutter-release halfway. Then a "+/-" meter usually shows up in the viewfinder. Twist the aperture setting until the +/- meter says you're right on...then you can adjust shutter/aperture to suit yourself. If you don't have any sort of light meter, you'll have to use the Sunny 5.6 rule. It's not great, but it's better than nothing. So that's about it: to pick a shutter/aperture combination, use a light meter, and know what your film speed is. Beyond that, there ain't much to say...until strobes complicate the issue. :) |

|
||
About | UW Photos | Scuba Picture Uv the Day | Flower Gardens | Aquashot | Trip Reports | RSDiver | Photo Instruction | News | Desktop/Screensaver Images | Site Map |
||