Aiming StrobesLet's face it: if your strobe system is positionable, using it is not going to be a "fire and forget it" sort of operation. This section will teach you the basics of how to position your strobe for best results.
If your pictures have this "snow" in them, you have a backscatter problem, and you can probably improve the situation by positioning your strobe properly. Exactly what causes backscatter?Backscatter is caused by the light from your strobe reflecting off of small particles floating in the water between the strobe and the subject. The water behind the subject also contains these particles, of course, but since the strobe light falls off like the square of the distance from the strobe, the particles behind the subject don't get nearly as much light as the ones in front of it. There's another effect at work, though. Presumably your lens is focussed on the subject. The particles in front of the subject get blurred because they are not in focus. Therefore, they appear larger than the ones near the subject, which makes them more noticeable. The theory behind backscatter is beyond the scope of this discussion, but we can make a simplifying approximation. Specifically, it's a pretty safe to assume that the light reflected by these particles is reflected mostly in the direction it came from. To be sure, some light gets reflected in just about every direction, but most of the light gets reflected into a narrow cone oriented towards where the light came from. The word cone is important here, because a significant quantity of light gets reflected a few degrees away from where it came. The quantity of light reflected (or "scattered") away from this direct line falls off rapidly with increasing angle. Remember this last point for a few seconds...
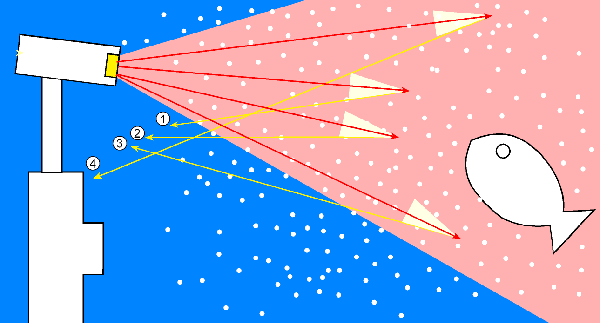
Figure 1 shows an example of a backscatter machine. This camera has only an internal flash, which means the light source is very close to the lens. The red rays demonstrate a few sample paths light can take from the strobe, and the pale red triangle shows the limits of where the strobe's light will travel. The white dots represent scattering particles in the water. The pale yellow triangles represent the cones of light scattered from the junk in the water. The bright yellow lines on the edges of the cones are there to show you where the light from the cone might end up. With that in mind, let's look at the 4 sample light paths, which are numbered 1 through 4 on the figure. Path #1does not actually end up entering the lens, so that scattering particle does not actually show up as backscatter in the picture. Path #2 does enter the lens, although it's probably going to be pretty dim, because the edge of the cone just barely sneaks into the lens. Path #3 makes it into the lens, with lots of cone to spare. It's also only half as far from the lens as the subject, which means it will likely be seriously out of focus. This one is going to be a big, bright spot. Path #4 reaches the lens, and more of its cone enters than #3, but it's almost all the way to the subject. This has two implications. First, since it's at least 50% farther from the flash than particle #3, it got only 40% as much light as particle #3, so it will be dimmer. It's also at almost the same distance from the lens as the subject, so it will probably be in focus. This means that it will be a bright, relatively sharp spot, but not as bright or nearly as large as spot #3. Fixing backscatter problemsSo how do we solve the backscatter problem? There are several ways to solve the problem. Let's look at them in order of usefulness. Solution #1: move the strobe away from the lens. Figure 2 shows the effect of placing the strobe far away from the lens. There are actually two effects. The first one is the most obvious: the backscatter gets directed back towards the lens rather than towards the lens. If you look at the 4 sample light rays in figure 2, you'll see that only one has much of a chance of reaching the lens, and it's way off to the left of the subject. To be sure, this diagram is schematic in nature, and the actual light cones are not particularly accurate, but the effect is rather obvious nonetheless.
The second effect of moving the strobe away from the camera lens is more subtle. Look at the area between the lens and the subject, and look at how much of that area is covered with strobe light in figure 1. Now compare that to figure 2, and you'll see that a lot less of the same area is lit by the strobe when the strobe is far away from the lens. So you get two benefits from moving the strobe away from the camera: (1) fewer scattering particles (between lens & subject, anyway) are lit, and (2) those that are lit send most of their light back towards the strobe rather than into the lens. Solution #2: move closer to the subject. By doing this, you'll remove even more scattering particles from between your lens and your subject. Fewer scattering particles means less backscatter! Solution #3: Find clearer water. You can play all the tricks you want in murky water and still get backscatter. I realize that #3 doesn't sound like much of a "solution," but there's a reason you don't see a lot of high-quality and/or professional u/w photography done in murky water: it's really difficult to do! What's the best position for my strobe?This is a difficult question that doesn't have a sure-fire answer, but there are some general guidelines you can use.
|
 The
#1 problem with using a strobe underwater is
something called backscatter, and it's the bane of every underwater
photographer. Here's a picture with lots of backscatter in it. Look in the
upper right corner of the picture and you'll see lots of white spots in
the dark region.
The
#1 problem with using a strobe underwater is
something called backscatter, and it's the bane of every underwater
photographer. Here's a picture with lots of backscatter in it. Look in the
upper right corner of the picture and you'll see lots of white spots in
the dark region.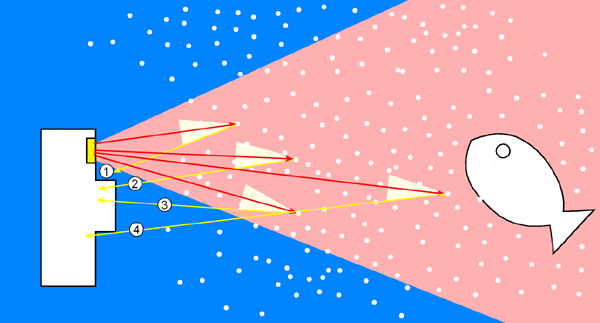

|
||
About | UW Photos | Scuba Picture Uv the Day | Flower Gardens | Aquashot | Trip Reports | RSDiver | Photo Instruction | News | Desktop/Screensaver Images | Site Map |
||