Required Equipment
An underwater strobe system is more than just the strobe itself. This
chapter will show you what components are required to assemble a working
strobe system, along with some other toys that might be useful to you.
Basic Strobe Setups
A basic strobe system, at minimum, consists of three components: the
strobe itself, a mechanism that holds the strobe in position so you can
aim it, and a connection to the camera that allows the camera to trigger
the strobe. Most often, these last two components will take the form of an
adjustable strobe arm and a synchronization (or "sync") cord,
but there are a few systems where that is not true. Most notably, many of
the snapshot camera systems employ a 'slave' sensor that triggers the
strobe when it senses the flash from the camera's internal flash unit.
This simple system works great and eliminates one potentially expensive
component (the sync cord), but it has the drawback of making TTL
photography difficult. One camera system, the Sea & Sea MX-10, goes
one step farther and mounts the strobe to the camera, so there's no
moveable strobe arm. This, too, eliminates a costly part, but at the
expense of giving up the flexibility to position the strobe accurately.
Let's look at the components, one by one, and discuss the features you
might want to consider before making a purchase.
Strobes
The strobe itself, of course, is the most important part of the system,
although it might not be the most expensive part. If you buy an
inexpensive strobe and an expensive strobe arm, you could easily get an
arm that costs more than the strobe. This probably isn't a good plan,
though. 
Strobes consist of three main parts, namely the strobe tube, the main
capacitor, and the charging & control circuitry. The strobe tube is
usually a discharge tube filled with a noble gas like xenon or neon.
Basically, the strobe tube works by shooting a bolt of lightning through a
special gas. The electrical current in the lightning ionizes the gas,
which then glows until the current is turned off. The good part about this
is that the lighting is very even across the whole tube. Another nice
feature of this setup is that there are no filaments to burn out; strobe
tubes rarely fail unless they are abused. Finally, it's relatively easy to
adjust the color of the light by changing the gas and the current levels.
The bad part is that the light doesn't last very long, because the current
is very high. Also, the voltage required to ionize the gas is high,
so strobes have to have special circuitry to allow the batteries to charge
a component in the strobe to the right voltage. Still, this design is so
robust and effective that it has become almost universal.
When you buy a strobe, there are several features that you should
consider.
- Light Output: this is probably the #1 consideration people
think of when they buy a strobe. Strobes are typically rated in
"watt-seconds" or joules. A 100 watt-second rating, roughly
speaking, means that the strobe puts out the same light as a 100-watt
light bulb would put out in 1 second. The thing is, the strobe
puts it out in much less time, usually 1/250 of a second! You can
think of a 100 w-s strobe as a 25,000-watt light that only stays on
for 1/250 of a second. The higher the rating, the brighter the strobe.
I'm not implying that brighter is always better, but a brighter strobe
gives you more choices in terms of apertures and subject distances,
especially if the strobe has multiple power settings.
However, you should not consider just the watt-second rating of the
strobe, because different strobes spread their light out through
different angles. If two strobes have the same watt-second
rating but one of them covers a larger angle, that strobe will appear
to be weaker than the other one. This might not be a bad thing,
though; read on!
-
|
A visible hotspot from my strobe.
|
Angular Coverage: the angular coverage of a strobe tells you
how great an angle the strobe spreads its light over. The larger the
coverage angle, the wider the strobe spreads its light. Wider is not
necessarily better, though. If you have a macro lens that sees 5 or 10
degrees of angle, a 100-degree strobe is just going to waste 90% of
its light. On the other hand, if you have a wide angle lens that sees
a 90 degree angle, a 50-degree strobe will light only a small portion
of the frame, leaving you with "hot spots" in your picture.
When selecting a coverage angle, the best plan is to match your strobe to your lens, within
reason. If you're shooting wide-angle, get a wide-angle strobe (i.e.
90 degrees or wider). If the manufacturer says that a strobe covers a
15mm lens, they're trying to tell you it has 90 degrees or larger
angular coverage.
If you're shooting macro, get a smaller, less powerful strobe that
concentrates its light in a small cone. You'll pay less, it will weigh
less, and it will do the job just fine. The smaller strobe will also
have a color temperature more conducive to macro work.
"Color temperature?" Read on!
- Color Temperature: If you go to Home Depot and look at fluorescent
lights, you'll see that they come in "warm" and
"cold" varieties. The same is true of strobes. Some are
redder ("warmer") than others. So what? Well, you already
know that water eats up red light first. If you're going to be farther
from your subject than normal, wouldn't it make sense to start off
with light a little redder than normal? Sure. That's why wide-angle
strobes are frequently warmer than macro strobes. Not always, but
frequently. Also, the strobe's color temperature doesn't always make a
huge difference in your pictures, but it can show up.
Confusingly, color temperatures are quoted in degrees Kelvin. You'll
see strobe color temperatures like 5300K, 4800K, etc. Here's the
confusing part: the higher the color temperature, the
"colder" the strobe light. That's because high-energy light
is actually blue, while low-energy light is red. If you want a way to
remember it, think of it this way: when a blacksmith works on metal,
it's red. When he heats it up more, it turns orange, then yellow.
You've heard of "white hot?" Same idea. The redder it is,
the lower its temperature.
Anyway, sunlight is 5500K light. Most macro strobes are in the 5300K -
5500K range. Many wide-angle strobes are in the 4800K-5000K range. The
reason for this is the old "water eats red light" issue.
Macro strobes assume you are going to be very close to your subject,
so there won't be much water between you & your subject.
Therefore, the color balance of the strobe's light will not shift much
by the time it reaches the subject. Wide-angle strobes, on the other
hand, generally assume that you will be no closer than 3 feet from
your subject--so they're often made to be a little redder (i.e.
"warmer," which actually means a lower color temperature)
than usual. Then when the water eats some of that red light, what
reaches the subject will be balanced properly.
- Recycle Time: When you fire the strobe, it dumps energy from
the strobe capacitor into the flash tube. When the strobe is done
firing, it has to recharge that capacitor before it can fire again. It
may not have dumped the whole capacitor, and you might not need a full
dump on the next shot, so it's possible that your strobe will recharge
instantly.
But full dumps are common enough, so it's always a good idea to let
your strobe recycle all the way before you fire it again. As
such, strobe manufacturers will quote a "recycle time" for
the strobe, which tells you how long the strobe takes to recharge the
flash capacitor from completely empty to completely full, on fresh
batteries. This last phrase is important, because as alkaline
batteries get weaker, they can't pump as much current, and the strobe
will take longer to recycle. Nicad and NiMH batteries can pump full
current until they're almost empty, so you can expect a strobe that
uses a nicad battery pack to have the same recycle time regardless of
the battery charge status.
Recycle times in the 6-second range are common. Basically, though,
shorter is better here, because you'd rather not wait 6 seconds for
another shot at the dolphin swimming past you. The fastest recycle
time I know of is 1.6 seconds; that strobe uses nicad batteries.
- Battery Life: basically, how many flashes a set of batteries
will get you. The more powerful the strobe, the faster you expect to
run down your batteries, but some strobes are more efficient than
others, and some use stronger battery packs. The more flashes you get,
the better. That's easy. BTW, don't ever expect to get exactly
the quoted number of flashes. Think of it as more of a range or an
estimate.
- Buoyancy: everything in diving can be buoyant, and so can
your strobes. The ideal camera system would be 100% neutrally buoyant,
and perfectly balanced, but it never seems to work out that way. The
closer to neutral the better. Don't pay much attention to strobe
weight unless you're worried about paying excess-baggage charges when
flying. Instead, worry about how much it "weighs" under
water.
- Exposure Modes: TTL and manual are common, but what you
really want is the ability to adjust the manual strobe output. A
strobe with only one power setting is not nearly as useful as a strobe
that has full power, 1/2 power, 1/4 power, 1/8 power, 1/16 power, etc.
Also consider that some strobes have *huge* power ranges, like
"full, 1/4, 1/64." Depending on how you shoot, you might be
better off with finer-grained controls.
- Price: Do I really need to explain this? Don't be fooled by
price alone. Compare how well the strobes you're evaluating meet your
needs, and then whether you can afford them.
The issue of coverage angle vs. power output is pretty easily summed up
by examining the strobe's guide
number (GN). The guide number is a measured number that tells you how
bright a strobe is on a real subject. The higher the number,
the brighter the strobe. A powerful strobe with a huge coverage
might be just as bright as a weaker strobe that concentrates it light into
a small spot--but the guide number should tell you that.
Unfortunately, many manufacturers are...um..."optimistic" when
it comes to reporting the guide numbers of their strobes. So check with
reputable sources when comparing guide numbers.
Strobe Arms
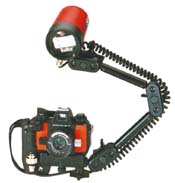
|
A Nikonos V with a tube arm setup.
Picture courtesy of Ikelite.
|
Strobe arms are the gizmos that hold your strobes where you want them.
A strobe arm usually has a bolt or quick-release at one end to attach the
strobe, and some mounting hardware at the other end to connect the strobe
to your camera. If you use a housed system, the mounting handle for
the strobe arm is probably integral to the housing itself. Nikonos users
will have to purchase a strobe tray, as will users of many other camera
systems. The strobe tray is basically a metal plate that mounts under the
camera and has attachment points to allow mounting the strobe arm. Strobe
arms themselves come in many flavors. There are aluminum tube arms, which
have a tube clamp to hold them in place. When the clamp is loose,
the tubes can rotate as well as slide in and out. This type of strobe arm
is usually the cheapest, although it can be a bit challenging to use.
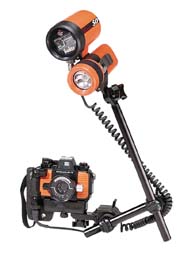
|
A Nikonos V with a ball arm setup.
Picture courtesy of Ikelite.
|
Another type of strobe arm has metal rods, tubes, beams, or "ladders"
with metal balls on the ends. This type of strobe arm uses a large wing
nut or hand screw to tighten the clamp (usually parallel metal plates)
against the balls. You can purchase arms with as many of these jointed
segments as you like, but most people live with two segments. These
"ball arms" offer a large range of positions and movements, but
have the disadvantage of being a little finicky to adjust. The ideal clamp
tension lets you move the strobe into place without releasing the clamp,
and then leave the strobe in place, but that ideal tension can be tough to
find. Ball arms are also notorious for not holding the strobes well when
out of water. This is usually only a problem when handing your camera up
to someone on the dive boat, but the potential for whacking your strobe
against the boat is still present. Ball arms are also the most expensive
type of strobe arm, because the balls are expensive to machine.
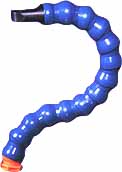
Yet a third type of strobe arm is the "bendy" arm, which uses
plastic knuckles that fit inside each other, end-to-end. This type of arm
offers the most complete flexibility you can imagine, but at the expense
of somewhat weaker holding power. They also tend to be inexpensive
compared to the other two types of arms.
My advice on strobe arms is this: don't worry about it. Buy whatever
looks good to you and is in your price range. I think people spend way too
much time thinking about their strobe arms. IMO, anything that holds a
strobe in position is good enough. About the only thing I think is really
important is some sort of quick-release mechanism so you can easily
hand-hold your strobe when you need to do so.
Synchronization Setups
When you fire your shutter, the camera has to trigger the strobe
somehow, right? Further, it has to do so only when the shutter is fully
open (click here if you want
to know why). Thus the camera has to synchronize or "sync" the
strobe to the shutter. The most common sync setup is the sync cord,
which is an electrical cord you connect to both camera and strobe. There's
not much to say about sync cords: buy the right one for your setup,
connect it carefully, and you won't have any problems. What is the right
one for your camera? Well, just about every camera and strobe manufacturer
has their own special connector for their gear, so you'll need to get a
sync cord that matches the stuff you own. For instance, if you have an
Ikelite strobe and a Nikonos camera, you'll need a sync cord that has a
Nikonos connector on one end and an Ikelite connector on the other end.
You can always find the right cable with a little hunting. It's worth
mentioning that some cameras and strobes do not have TTL controls; in some
cases you need to make sure to buy a non-TTL sync cord in order to avoid
damaging some of the components. If you have a very old camera or strobe
mated to a new camera or strobe, check with the strobe manufacturer for
recommendations on this issue. Strobe sync can get a little more
complicated, though, especially if you are setting up a dual strobe
system. Dual strobe systems are common, especially for macro shooting.
Clearly, a dual-strobe system needs some way to sync both strobes. One way
to do this is to use a dual-sync cord, which is a sync cord with one
camera connection and two strobe connections. This works fine, although it
can limit the positions of your strobes if the cord is too short.
Another way to sync the second strobe is with a slave sensor. Slave
sensors, as mentioned above, fire their strobe when they see the light
from another source. Some strobes come with built-in slave sensors,
although many of them are not TTL sensors. Ikelite manufactures a TTL
slave sensor that quenches its strobe when the light from the master
strobe quenches. This unit can control only Ikelite strobes. So there
you have it. A basic strobe system consists of three major parts: the
strobe, the mounting system, and the sync setup.
Next Chapter | Back
to Strobes
|