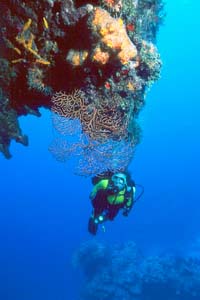
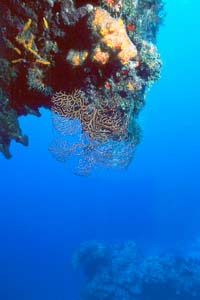
Working With PeoplePeople (i.e. divers) in your pictures is an important compositional tool. Basically, people love to see people, so adding a diver to a picture is an easy way to add interest for the viewer. It's also an easy way to take an otherwise-boaring subject and add a little life to it. I have tons of pictures of sponges, sea fans, coral heads, etc. that seemed interesting at the time, but the final slide, when seen on a light table or projector, was just plain dull. Adding a diver can make the difference between an boring picture of an attractive subject and a memorable picture of the same subject. Here's an example for you. I took this picture of my wife and a sea fan on Cozumel in February of 2000. Then, through the magic of Adobe Photoshop, I removed her from the picture. Look at the difference between the two pictures, and tell me which one you like better.
These pictures are identical except for the presence of the diver. To me, the one on the left is much more dynamic and interesting. The diver provides several things that the right-hand picture is missing: (1) a sense of "being there" (most divers do not dive solo, so they're are accustomed to seing the scenery with other divers), (2) a size scale, so you can see exactly how large the sea fan is, (3) some extra color, and (4) another perspective cue--clearly Annemarie is in behind the sea fan, but in front of the coral formation behind her. Without her in the picture, you can't easily tell much about the lower coral head. Mostly, putting people in your pictures is easy, although there are several basic considerations you'll want to think about ahead of time. Let's look at the various aspects of photographing divers. Equipment & StreamliningYour goal in placing a model in the picture is to make the model one center of attention, and the 'secondary subject' the other center.. As a result, you don't want your model's gear to become a center of attention; that will distract the viewer from at least one of the main things you want them to focus on. So one of the prime considerations with models is to streamline their gear. Many pro photographers have their models wear simple, small back-infated BCDs. These units are so streamlined that they almost disappear. I don't necessarily think this is the ideal situation, but it is one way to make sure the model's gear does not interfere with the rest of the picture. Mostly, I think it's important for model divers to be exactly that: model divers. By that I mean that they should be streamlined as much as possible, and their gauges and hoses should be tucked in and / or clipped off. They should be weighted as close to ideal as possible, as this will reduce the amount of air in their BCD bladders. Fully-inflated bladders will look strange, and generally "bad" in your pictures. It's also probably a good idea for your model to wear a wetsuit or dive skin that is some fairly bright color. Models dressed completely in black should be avoided, as they just will eat up light and produce an uncomfortable dark spot in your pictures. I'm not sure I recommend solid yellow, on the other hand, as it doesn't offer a good contrast. Probably the best setup is a combination of some bright and dark colors, like yellow and black, yellow and blue, silver and teal, etc. Finally, it's a good idea to get your model to tuck gauges away so that the face plates of the gauges do not face towards the camera. If gauges face outward, they can reflect light from the strobe and show up as hot spots in the picture. Remember: your goal is two make the model the #1 or #2 attraction in the picture; if the viewer's eye gets drawn to a gauge, some other subject is going to lose that attention. Body PositionBody position is important, too, because you don't want your model to look so unnatural or uncomfortable that the viewer takes notice of the fact. Basically, the best thing to do is probably to have your model swim naturally and try to time your shot for a time when the model's legs are crossing each other duing the kick cycle. There are photographers who have their models "drop a shoulder" to produce a foot-to-shoulder crescent shape, but I really don't like that pose. The only time it looks natural to me is when the model is swimming around something. Another thing to consider is regulator bubble trails. In most pictures, you will want to avoid taking a picture with bubbles in it. There are times when the bubbles provide a useful cue, (for example, when you want to show that the diver is swimming by photographing the bubble trail), but in most cases they just distract the viewer's attention. In no event do you want to take the picture with a stream of bubbles even partly obscuring the model's face. Of course, you can't ask your model to hold her breath while you take the picture, but if you talk ahead of time about bubbles, breathing, and modelling, your model will be able to help you sidestep the problem. Mostly, you want to make your model aware of the fact that you want to take pictures without bubbles in them, so your model can take long, slow inhales, giving you time to trip the shutter. Be sure to work out a signal with your model to tell him/her that there were bubbles in the shot and you want to try again. See the section on communication below. The last area of body positioning to discuss involves the most important body part: the eyes. Here's a simple rule of thumb for you: you must be able to see your model's eyes in the picture, or you have basically wasted your time. There are exceptions to this rule (most notably silhouette and diver-sealife interaction shots), but in general, if the diver is going to be subject #1 or #2, the eyes are critical. There are two parts to being able to see the model's eyes. The first of these is that the diver's mask must be pointed basically towards the camera. It doesn't have to point directly into the lens, but it has to point in the general direction of the lens. An important thing to remember is that the model does not have to look at the lens. She is free to look anywhere, preferably at subject #2. But her mask has to point towards the camera or you won't be able to see her eyes. The second part to being able to see the model's eye is the strobe lighting. Since most of the light you will be using is going to come from a strobe, that light has to be able to reach the model's eyes. In general, that means that your model is going to have to tilt her head upwards, towards one of the strobes. She has to perform a delicate balancing act of looking at the subject while looking towards the camera and holding her head so that the strobe can light her face. A make with a transparent or translucent frame goes a long way to help this. Opaque frames frequently cast a shadow across the model's eyes, which results in a dark face. Ugh. One last consideration concerning the model's face and the strobe: if the angle between the mask glass and the strobe is too extreme, the light from the strobe will reflect from the mask, rather than pass through it. In this case, you will get a glazed look, as if the model's mask were a mirror. This, too, should be avoided. With a little experience, though, your model will know where to point her mask. CommunicationCommunication is the most important thing to learn when working with a model. If you want her to look in a particular direction, you have to be able to tell her that. If you want her to swim along a certain path, you need to be able to communicate that, too. If you don't work out some signals ahead of time, you're doomed. Furthermore, it's handy if those signals can be done with one hand, because you might be holding the camera with the other hand. Here are a few of my most frequently-used signals.
Composition ConsiderationsComposition with a model is critical, because how you compose the picture will decide how much "weight" your model has, compared to the other subject. In most cases, you will want to position the model behind the subject slightly. You don't want the subject to block your view of the model, but you want the model farther away from the camera than the other subject. There's a simple reason for this: if you're shooting with a model, you're almost certainly using a wide-angle lens. In this case, there will be some distortion of perspective due to the lens. That is, things that are farther away from the lens will seem extra far away, while things closer to the lens will seem extra close. By positioning your model farther from the lens than the subject, you accomplish two things. First, you make the second subject seem larger in comparison to the model, which will generally make it more impressive to the viewer. Second, you make the second subject brighter than the model, because the strobe light will be more intense on it. This trick allows you to emphasize the second subject over the model. Since your model is rarely going to be the main subject, this is often desirable.
|
|
||
About | UW Photos | Scuba Picture Uv the Day | Flower Gardens | Aquashot | Trip Reports | RSDiver | Photo Instruction | News | Desktop/Screensaver Images | Site Map |
||