Tools For Composition
All right. Enough abstract talk. Underwater photography is all about doing,
and I'm not helping you do with all this non-specific stuff.
Here are some common tools you can use in your composition. What I mean by
"tools" is this: I'm going to list some options of composition that are
generally readily available to you on most dives. You can choose to use them, ignore
them, or even incorporate several of them in the same photo. They're not listed in any
particular order, and the list is certainly not exhaustive. This is just the toolkit
of compositional techniques I find most useful, personally.
Blue Water / Negative Space
"Negative space" is a photographer's term that just means "space in the
picture with nothing going on in it." Usually you see lots of negative space on
magazine-cover photographs, because the editors want a place for their headlines &
blurbs. But that doesn't mean you can't use negative space in your pictures!
Negative space helps define the rest of the image, and helps the subject stand out from
the background.
Blue water is a common negative space. So is "black water" if you're
shooting at night or with an aperture so small that ambient light doesn't expose the film. |
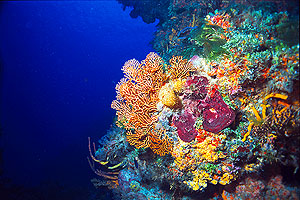
The blue water on the left side of the frame is negative space, and it frames the
sea fan nicely.
|
Shooting "Up"
As I've mentioned in at least 117,353 different places on this site, you generally want
to be below your subject, shooting upwards. There are several reasons for this.
One of them is to help your subject stand out from the background. Another is
to get a nice evenly-lit background from the ambient light, instead of relying on strobe
exposure for all of your light. And finally, if you don't shoot upwards, you can't
use the next tool in the bag, namely...
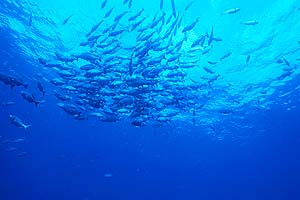
Do you see Snell's Window? It's the bright semi-circle in the
background water at the top of the picture. Notice how the chub inside Snell's Window draw
your eye, but the ones outside seem extraneous and boring. |
Snell's Window
Willebrord Snell was a 16th- and 17th-century mathmatician who discovered the
physical law that governs the refraction of light when it crosses from one material to
another. Basically, the guy invented modern optics. What does this have to do
with underwater photography? Well, you've seen the effects of light bending
("refracting") when it crosses from water to air (i.e. a half-submerged pencil
looks broken), but did you know there are effects going the other way, too? Put
simply, the water bends light from the surface so that all direct light takes the shape of
a cone of a particular angle. As a result, there's a maximum angle looking upwards
from underwater beyond which you can't see any light from the surface. Inside the cone,
(i.e. inside "Snell's Window"), and light from the surface
passes down to you. Outside of the cone, you get very little.
The effect of this is to create a circle of light on the surface of the water. This
circle is larger when you are deeper, and smaller near the surface.
So what? Well, look up the next time you're under water, and you'll probably see
Snell's Window. It's a tremendous boon to uw photographers, because you can put your
subject inside Snell's Window and suddenly it jumps out. If you put the subject
outside Snell's Window, it will look muted.
Click here if you want to read up on the physics of
Snell's Window. |
Rule of Thirds
We've already been over the rule of thirds, so I won't go into it again. It's
important for you to realize, though, that the rule of thirds is just a tool. You
don't have to use the tool if you think you can do a better job some other way.
Diagonal Lines
Diagonal lines are powerful, especially if there's a difference between what's on one
side of the line and what's on the other side. If there's a line you can arrange to
be diagonal, consider using it.
Leading Lines
Leading lines are lines that either run out past the edge of the frame, or end before
the end of the frame. They draw the viewer's eye along the line and then the eye
keeps going in that direction. If you put your subject in an area where the viewer's
eye will be led by lines in the picture, it appears more dramatic.
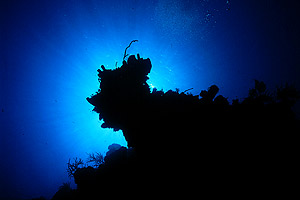
Silhouettes
Silhouetting is when you use a light behind the subject (usually the sun) to brighten
up the water and give you a dark shadow representation of your subject. If you place
the sun directly behind your subject, you're almost certainly going to get a
silhouette--expose for the water, and the subject should be naturally dark.
Silhouettes generally only work with well-known shapes, like mantas, sharks, turtles,
and people. If the subject doesn't have pleasing lines of its own, silhouetting it
is likely not going to get you anything. |
 |
Adding a diver
People love people, and divers are a "natural" addition to any photograph.
An otherwise ordinary photo of a sponge, grouper, or sea fan can be jazzed up by
posing a diver interacting with the subject. I'm not telling you to harass the
marine life, of course, but placing a diver near a sea fan, looking at said sea fan, will
draw the viewer's eye towards the sea fan (people naturally want to see what someone else
is looking at) and lend a sense of scale to the picture.
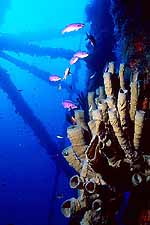
CFWA / Perspective Distortion
This is a really fun one. CFWA and its attendent perspective distortion often
adds an element of humor to a boring subject. It can also be used to place the
subject in its natural environment without letting the environment overpower the subject
itself. The picture on the right was taken from ~2 feet from the sponges, using a
20mm lens behind a dome port (i.e. roughly equivalent to a Nikonos 15mm lens). The
sponges look huge, especially in comparison to the rig legs on the left side of the
picture. |
 |
Inside Out
If you come across a "porthole" situation, either inside a ship or behind a
tight swimthrough, you can use that to your advantage. Anything framed through the
"porthole" will instantly become the subject, almost no matter what it is.
Be sure to get some of the hull, bulkhead, coral, whatever it is that defines the
porthole. Without the obstructing material in the picture, you lose the porthole
effect. If you use a strobe, try a low power setting; you don't want the walls of
the porthole to be too bright. Also don't bother trying to get any strobe light
through the porthole and out to the other side; it won't work unless the subject is
basically in the porthole.
Next Chapter | Back to
Composition 101
|